FAQ QUICKNAVIGATION
AMP1
General
Tube
Operation
Setups
Speaker / Out
Recording Out
Power
Power Soak
Software
MIDI1
Sound
FX-Loop
Boost
EASY LOCK
AMP1 Mercury Edition
What´s new?
REMOTE1
REMOTE1
LOOPERKIT
MORE PRODUCTS
GUITAR61
BLUBOX
Visit us at the 2020 NAMM - Booth #3541
« back

There is no 19 "Rackmount version from the AMP1. However, the AMP1 is so small and so light that it can easily be incorporated into the rack, e.g. In the compartment for the floor pedals or Rack Drawer.
Video Rackmount
Is there a stereo version of the AMP1, or in other words can the AMP1 be operated in stereo?
The AMP1 is built like a classic amplifier and has a mono power amp. For stereo operation, however, you can easily combine two AMP1s with their own separate cabinets. With REMOTE1 and MIDI1, both amps can be controlled simultaneously: REMOTE1 is connected to the first AMP1 via the foot switch connection. The second AMP1 is connected to the MIDI OUT of the REMOTE1 using the MIDI1 adapter. Each switching function of REMOTE1 now affects both AMP1s. Since the output amp changes its sound with the channels, the second AMP1 should be programmed using MIDI LEARN so that the same channels are always active with both AMP1s.
Video mono/stereo
If the AMP1 is connected to a power supply via the power cable and via a box cable to a loudspeaker, it hums quietly but audibly in the box, even if the AMP1 is switched off. Is that normal?
Yes, The power switch of the AMP1 is located in the secondary circuit. As a result, when the amp is switched off, there is no proper disconnection from the mains, as is the case with many modern devices. Strictly speaking, the AMP1 is then in standby. The transformer also builds up its magnetic field in this switched off state, which then goes directly into the speaker and becomes audible. In many other tube amps a similar phenomenon occurs. If that is a problem, one should use a switchable power strip, so that one can disconnect the device by switching it off completely from the power supply.
When the CLEAN channel is active, the LED on the Channel Select switch on the AMP1 changes its brightness depending on the signal level. Is that normal?
Yes. Inside the AMP1 there are LEDs which serve as an optical confirmation for the signal flow and the signal level. These are indicated by a plastic ring around the foot switch for channel selection when the CLEAN channel is activated. This is completely normal and has no effect on the sound. These LEDs are always working, but they can only be seen from the outside when the CLEAN channel is selected.
The AMP1 setup works at home without problems, but on stage there are sometimes feedback problems with the overdrive channels. What can be the cause?
There are several possible causes for such a phenomenon. If the AMP1 works at home without problems, then with certainty we can assume that the AMP1 is not the problem. To find out where the problem comes from, consider the following:
There are many possible reasons for a humming noise coming from any guitar amplifier. Please proceed as follows to identify the source of the noise:
Disconnect the guitar cable (resp. any cable) from the AMP1’s input, connect a speaker cabinet to the amp and switch the noise gate on. It should be quiet. Then switch the noise gate off. What you’re hearing now is the noise from the preamp(s). Next step: connect a guitar to the amp’s input, and put the guitar volume down. Any change in the noise comes from the cable. Then turn up the volume of the guitar, and you can hear the noise that comes from the guitar.
As a next step you may check all pedals used in front of the AMP1 or in its FX loop step by step, until you can isolate the source of the humming.
Can you use the AMP1 also for Bass Guitar or will it harm the AMP1?
You can connect a bass to the AMP1, like any other guitar amp. It does not sound bad at all! However, the AMP1 is not designed with the power capacity of a bass amp. For guitarists, 100 watts are generally more than adequate. For bassists this is usually not enough power. When selecting a loudspeaker, care must be taken that the impedance of the loudspeaker is NOT less than 8 ohms. When the ohmic load is too low, the AMP1 delivers more power than it’s designed too, AMP1 will overheat and then switch off. It is not broken, thus you will have loss in sound - and that is not desired.
What material are the Homeplate Guitar picks made of and how thick are they? The Homeplate Guitar Picks are 1.5mm thick. The black version is made out of ABS, the blue version is made out of PMMA.

The Nanotube is designed in such a way that it has 3 times the life span of a standard ECC83 tube.
The Nanotube has a slightly lower operating voltage compared to it´s conventional use, and as a result of this it has a smoother characteristic curve, and thereby a significant sound improvement. This also doubles or can even triple the life of the Nanotube. In addition, there is no contact problems with the socket on our tubes. Traditional tubes are mounted on a socket base, while the Nanotube is soldered directly onto the PCB. Because of this feature a failure of the tube is highly unlikely. The nano tube will never need to be exchanged.
More

 If a tube change is required despite our great design, the tube must be replaced by an authorised BluGuitar technician.
Is the AMP1 like a tube amp? Does the AMP1 go to the (power)amp distortion / saturation?
Yes, the AMP1 behaves in the same way as known tube amps. By increasing the master volume, the AMP1 goes into saturation like a classic all-tube amplifier and also produces amp saturation and with high driven settings even power amp distortion.
More about the concept and the structure of the AMP1 is available in this video
With a higher MASTER-setting (from approx. VOLUME 5 and MASTER 5) of my AMP1, a "bell ringing sound" can be heard when switching or when I tap on the housing near the tube. Is that normal?
Yes, this is normal for tube amplifiers. If you tap on the chassis of any other tube amplifier (e.g., Marshall, Fender) at this volume, you always hear a slight noise from the tubes.

The factory reset for the AMP1 works as follows: Turn off the AMP1, hold down all three foot switches on the AMP1 and turn the AMP1´s power back on again. Then release the three foot switches.
Can the Custom Control and EQ settings be stored for each preset?
No, the settings cannot be saved. They are set on the AMP1 and are used for all presets accordingly. The channels of the AMP1 are matched to one another in such a way that they provide a similar frequency spectrum. This makes the sounds of different channels sound better together; the guitar retains its "frequencies" while playing with other instruments in the band, and remains always present during sound preset changes.
Can Gain and Volume settings be stored per preset?
The settings can only be saved by using REMOTE1 or MIDI. If you use the AMP1 “standalone", these parameters are set on the AMP1 and used for all presets accordingly.
The foot switch of my AMP1 does not react when pressed down, only when it is released. Why is that? Can I change that?
When the AMP1 is operated in Direct Access mode, all foot switches react when pressed down. Depending on the software version of the AMP1, there are differences for the operation in the Preset Mode: In an early software version, the switches did not react when they were pressed down, only when released. In the meantime, there is a newer software, in which the switches react as soon as they are pressed down. All new AMP1s are equipped with this software. If you use the preset mode a lot and have an AMP1 with the old software, we offer a chargeable software-update.
Please contact our service department: service@bluguitar.com.
Is it possible to access all 4 channels without the REMOTE1 or MIDI? If so, how does it work?
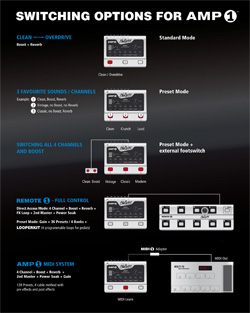 You can connect on the foot switch connector of the AMP1 not only the REMOTE1 or the MIDI1 adapter, you can also connect a normal *1. 2-way foot switch with a stereo jack. * 2. The two switches on the external foot switch then CLEAN / OVERDRIVE and BOOST on / off (the respective functions of the left and the middle internal foot switch of the AMP1). If you use AMP1 in Preset Mode, with the three internal foot switches having a different Overdrive channel (eg. VINTAGE for the left, CLASSIC for the middle and MODERN for the right internal Footswitch) (alternatively with BOOST or / and REVERB on or off), the double foot switch is used to access the CLEAN channel, and thus you will get to all 4 channels. With the second switch of the external Footswitch you can still switch BOOST on and off per channel.
*1: Not all foot switches work with AMP1. See "Functionality with other devices"
*2: A mono foot switch is also usable. This then switches between Clean and Overdrive, thus taking over the function of the left internal foot switch of the AMP1 in Direct Access Mode.
Video on the topic
If I activate the BOOST in the Preset Mode with the help of an external foot switch, it will automatically switch off when switching to a different preset that was not programmed with BOOST. If I switch with the external foot switch between CLEAN and OVERDRIVE, it remains activated. Why is that?
The external foot switch is not part of the "Learn" function in the AMP1. When a preset is recalled using one of the three internal AMP1 foot switches, the AMP1 automatically activates the switching functions stored on this memory — including BOOST and Reverb on / off. The external foot switch always has the same two functions, regardless of the settings stored in the currently activated preset: Change between CLEAN and OVERDRIVE and BOOST on / off.
When I use the CLEAN channel with the boost to get a fat crunchy tone, the CLEAN channel is always louder that the VINTAGE channel resp. the overdrive channels. How can I correct that?
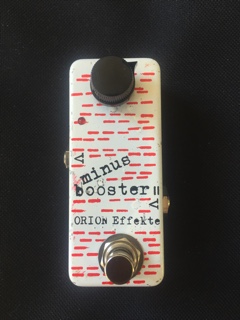 Get a „minus booster“ (a passive volume potentiometer) or a volume pedal to reduce the level - use it in the serial FX-LOOP. This can reduce the volume for the clean channel when you use it overdriven.

The best way to do this is to use the 4-cable method. The pre-effects (booster, distortion, compressor, etc.) of the multi-effect device run into the input of the AMP1, and the loop effects (reverb, delay, modulation effects, etc.) run into the FX-Loop on the AMP1. This gives you “the best of both worlds": a fully analogue based sound combined with the flexibility of digital effects.
Here Thomas explains how its done.
Can I use other distortion pedals / boosters?
Yes, as with other tube amps a distortion or booster can be used with the AMP1. In particular, the channels CLEAN and VINTAGE have been designed for combination with other pedals.
Why do not all foot switches work with LEDs?
The switching process using the foot switch connected to the REMOTE-socket of the AMP1 is performed by measuring the voltage at this socket. Foot switches without LEDs always work. A foot switch with a LED without an internal resistor also works. In the case of foot switches with LEDs the resistor can be too big, so that the voltage drop is not sufficient to trigger the switching operation.
I use a digital preamp in combination with a transistor power amplifier. Can I connect the preamp to the FX RETURN of the AMP1? Will my sound be more vibrant and will I get more a tube sound and feel?
The power amp of the AMP1 behaves and sounds like any classic tube amplifier. The signal of the preamp will of course be more alive. Due to the digital preamp, the signal still remains somewhat more compressed compared to a full-tube amp or the AMP1. But if you like this pre-amp sound, the AMP1 power-amp will certainly give you more "Tube feel" and help you feel good about the sound.
Can the AMP1 be used as a pure overdrive pedal?
Even if the AMP1 has been designed as a complete guitar amplifier with preamp and power-amp, it can be "misused" as an overdrive pedal. Due to its format as a floor pedal, it is actually also well-suited as a "noble distortion".
Use the FX-send directly into the INPUT of another guitar amplifier. The Treble setting of the AMP1 should be set to low, because the second amplifier generally boosts treble. In addition, the FX loop level switch on the bottom of the AMP1 should be set to "LOW" position to avoid an excessive output level. In order to avoid possible hum that is created by ground loops, you can use a DI box (for galvanic separation) between AMP1 and the second amplifier.
Video on the topic
Will a clean boost pedal in the FX loop work fine for 2nd master volume respectively solo boost?
Yes, it will work, as long as you witch the FX loop to serial mode. But please mind a few things: If you boost volume in the FX loop, you will not only increase the volume, but you will also saturate the tube driven power amp stage. Result: the sound will change. So if you’d like a second volume for rhythm/solo level without changing the sound, then you better use a volume pedal or a minus booster to reduce volume instead of increasing it.
Please also keep in mind that the FX loop can be set to two different volume levels. Use the push/push level switch on the bottom of the AMP1, because this can also change the sound of your pedal in the loop.
When using my AMP1 with an HX Effects in 4 cable method, I get a strange noise on the overdrive channels, especially in VINTAGE and CLASSIC. What’s wrong there?
This is not an AMP1 issue, it’s an HX Effects issue, and Line6 eventually fixed it in the latest version of the HX Effects. So this noice only occurs with an older version of the HX Effects. It’s coming from the HX Effects’s pre-loop. Make sure you switch that loop to instrument/sensitive, this is going to help either way. Please contact Line6 if can’t get the issue fixed!

Yes, this is possible. The AMP1 will not be damaged without a connected loudspeaker cabinet. Simply connect the REC OUT jack of the AMP1 to a PA system or headphones without using a loudspeaker cabinet. You can also increase the saturation on the power-amp (Master 5 to 7), in order to get an even fatter sound.
Which speakers (or cabinets) are recommended for AMP1?
AMP1 has been voiced for use with classic guitar speakers in the style of Celestion Greenback and Vintage 30s. Of course, depending on your taste other speakers can also be used. For the best sound with a compact design, we recommend BluGuitar NANOCAB and BluGuitar FATCAB.
More on this subject
Do I have to consider the capacity (watts) of my speakers when connecting my cabinet?
Yes, AMP1 can deliver the power of 100W. If the volume is too high you can damage the speaker. The MASTER controller behaves in such a way that position 5 produces approx. 25-watts, position 6 approx. 40-watts, position 8 approx. 70 watts and position 10, 100 watts of power. More importantly, the impedance of the loudspeaker should not be less than the impedance specified on the SPEAKER OUT jack on the AMP1, since the AMP1 can even produce more than 100 watts of power if the impedance is too low. This can be very dangerous for the loudspeaker. There´s a simple rule how to detect the speaker´s limit. Turn the volume up until the sound is getting no more louder, but muddier. Roll back a bit and your speaker is safe. Hundreds of AMP1 are used with just one single BluGuitar cabinet (rated at 60 Watts) without any problem or damage. Just follow the simple rule: Do not turn the volume higher when the sound is getting no more louder! (approx.7 Master on AMP1 in combination with NANOCAB or FATCAB)
How can I connect multiple speakers to AMP1?
AMP1 has two loudspeaker outputs: 8 Ohm and 16 Ohm. If the impedance of the cabinets matches the output of the AMP1, the AMP1 produces the full output power: 100-watt sinus / 150-watt peak. If you use two 16-ohm speaker cabinets, connect them in parallel. This way you will get a total load of 8-ohms, perfect to be connected to the 8-ohm output on the AMP1. If you have two 8-ohm loudspeakers, connect both loudspeakers in series. Then we get 16-Ohm as our total load, perfect to be connected to the 16 ohm output on the AMP1. If you have an 8 ohm and a 16 ohm loudspeaker cabinet, connect both speakers in series. This way we get 24 Ohm as our total load. This connection should be used on the 16 ohm output of AMP1. The power-amp still produces about 80 watts. With the extra volume of the two loudspeakers, it will be louder. And the power-amp of the AMP1 works under perfect conditions. If you connect both speakers in parallel, you get an impedance of 5,333 ohms. In this case, the power-amp could produce peaks that can exceed the150 watts limit of the power amp. The overload protection would turn off the sound for milliseconds - and that’s not what we want. When using a 4x12 " with a 4 to 16 Ohm switching option, make sure that it is set to 16 Ohm and is connected to the 16 Ohm output on the AMP1. This way you can be sure that there the built-in protective circuit cannot be activated, creating a "loss of sound".
Both NANOCAB and FATCAB have a power rating of 60 watts - AMP1 can deliver up to 100 watts. So you should turn the MASTER control not higher than 7 without risking damage to the loudspeaker of the respective cabinet. Why does BluGuitar not produce a 1x12 "box with a 100 watts speaker?
The question of the power handling of the BluGuitar loudspeakers is quite justified. However, there are actually good reasons for designing the two speakers in NANOCAB and FATCAB in a 60 Watts version. If there was a 100-watt loudspeaker that would correspond to our (or Thomas Blug’s) sound ideals, then we would use it. We found a physical problem that cannot be changed: 100-watt speakers need a larger 2-inch voice coil. Due to the size of the voice coil, the membrane of the loudspeaker will inevitably become stiffer, and this is at the expense of sound (especially at low and medium volume). The BluGuitar speakers have a smaller voice coil that makes them sound much more alive and consistent especially at lower volumes. However, this smaller type of voice coil can only handle 60 watts. The BluGuitar speakers have the liveliness of a Celestion Greenback and are almost three times as strong. They withstand the load of a loud AMP1 very well. Master settings over 7 on the AMP1 will make the loudspeaker (one Nanocab or one Fatcab) simply not get any louder. If you turn the master up beyond this point, you will actually destroy the BluGuitar loudspeakers during continuous operation. If you need even more volume you should use an extra speaker cabinet. Our experience is that both NANOCAB and FATCAB are so loud in use that even large open air stages can be filled with sound adequately, as long as you don't play Heavy Metal. If a single BluGuitar cabinet is actually too quiet for you, then you should use two cabs. The combination of 2 NANOCABS or 2 FATCABS or one NANOCAB and a FATCAB (Thomas Blug’s personal favorite) is extremely loud, and sounds also really good. In addition when using 2 cabinets you can increase the spread of your sound much better on stage by putting one cabinet behind you, and a second beside you.
Can I run the AMP1 with a load box (e.g., Palmer ADIG-LB)?
Of course, the AMP1 can be operated with a load box if you want to use the signal of the speaker simulation from your load box. In addition to the speaker simulation on your external load box, one can also use the internal speaker simulation from AMP1. In this way, two different speaker simulation signals are obtained and can be mixed together — like a speaker cabinet with two different loudspeakers. In this context, we also recommend our BluBOX VSC speaker simulation, which offers 16 legendary speaker/microphone combinations using high-end convolution technology. Unlike amps with a traditional tube power-amp stage AMP1´s innovative power-amp works even without a load, without damaging the power amplifier. AMP1 in combination with the BluBox will give you countless outstanding direct sounds and even for silent recording.
Are the BluGuitar cabinets also compatible with other manufacturers' guitar amplifiers?
Yes, sure, that goes without saying. NANOCAB and FATCAB are conventional guitar cabinets with 60 watts of power and an impedance of 8 ohms that can be connected to any guitar amp, and they also deliver excellent sounds with other amplifiers.

AMP1 works with a very complex full analogue speaker simulation. The RECORDING OUT signal can be connected directly to a mixing console. A total of 7 different filters reproduce the sound characteristics of a guitar cabinet. The signal sounds open and fresh without scratching sounds and delivers a powerful bass without booming. This is as good as it gets with analog speaker simulations. The sound quality of a direct recorded speaker box with a good microphone and the correct microphone positioning cannot be achieved in this way. Nevertheless, the RECORDING OUT of the AMP1 provides a very good signal, which gives you great results live and in the studio.
If you want to get even closer to the sound of a miked up box, without having to use a cabinet, you should use devices that work with digital impulse response speaker simulations. To get an unfiltered signal for this kind of application, use a DI-box with a PAD attenuation function direct on the speaker output of the AMP1 to reduce the speaker signal level to line level. Highly recommended is our BluGuitar BluBOX, a professional Impulse-Response-Speaker simulation in the Form of a DI-Box-with a virtual collection of 16 legendary cabinets.
Video on the topic
Can the speaker simulation for REC OUT be switched off?
No, this is not possible. There is always a speaker simulation when using the REC OUT connector. An unfiltered line signal can be taken from the FX SEND or even better using a DI box with PAD attenuation function on the SPEAKER OUT.
Is the REC OUT on the AMP1 a mono or a stereo jack?
The REC OUT on the AMP1 is a stereo jack.
Does the REC OUT sound better if I have a speaker cabinet connected to the SPEAKER OUT and thus create a negative feedback in the power amplifier?
When a loudspeaker is connected to the AMP1, the negative feedback provides in fact, a little bit more punch and bite for the REC OUT signal. However, a resonance filter in the bass frequencies also works in the REC OUT, which gives the signal even more vitality and punch when no loudspeaker is connected. The differences are therefore marginal.
What kind of cable do you recommend to connect REC OUT of the AMP1 directly to the P.A. or to a mixing console?
The REC OUTPUT jack socket on the AMP1 is balanced, which can drive long cables without interference. When using mono jack plugs, it becomes unbalanced. So an unbalanced jack/jack signal cable is good enough to connect the REC OUT to the LINE IN of a channel strip on a mixing console. For longer cables, the use of a DI box is recommended to avoid signal losses due to unbalanced cables that are too long. In addition, the use of a DI box is generally also recommended to avoid unwanted hum. In this case use a short (unbalanced) signal cable to connect the REC OUT of the AMP1 with a DI box and connect the DI-box to the MIC IN of the channel strip on the mixing console with a (symmetrical) XLR microphone cable.
In order to saturate the NANOTUBE in the power amplifier of AMP1, the MASTER VOLUME must be turned up very high. Can the saturation of the NANOTUBE also be heard when using the REC OUT?
The REC OUT of the AMP1 is fed by the SPEAKER OUT signal, which means that all signal stages - including the power-amp stage - of the AMP1 are present. This means that the sound of the NANOTUBE going into saturation can also be heard on the REC OUT.
Can the REC OUT of the AMP1 be easily connected to an active speaker cabinet (P.A. or Studio monitor)?
Yes, this is possible. Should a hum occur, a DI box should be connected between the two units.
Can the REC OUT and the SPEAKER OUT be operated simultaneously?
Yes, the AMP1 has been specially designed so that both signals can be used simultaneously. Incidentally, one gets very interesting results when a miked-up cabinet and the REC OUT signal are combined.
What is the best way to get an unfiltered line signal from the Amp1 to a recording interface? By that I mean bypassing the speaker simulation so I can use digital IR's in my DAW.
Simply use a DI Box with a pad function (-20dB eg) on the speaker out to feed your recording interface.

The 100 watts are RMS power. The peak power of the AMP1 is 150 watts.

Since not everyone needs this function, since AMP1 sounds also very good at low volume, and the AMP1 itself has no more space for further controllers, we decided that the Power Soak can only be controlled via external controllers.
This is possible with the BluGuitar REMOTE1. It is also possible with the BluGuitar MIDI1 adapter interface and a MIDI controller from another manufacturer. The MIDI device needs to be able to send the Control Change number 30 to access the Power-Soak function in AMP1.
With the REMOTE1 connected to AMP1 I have no control of the POWER SOAK. On the right control area, it shows full power, no matter where the controller is. If the knob is turned to the left, the output will jump into the "Home" area, but I hear no difference. Is there an error here?
First of all: If the performance jump from STAGE to HOME is audible, the POWER SOAK works correctly. Nothing is broken, there is no defect.
The POWER SOAK in the AMP1 works differently compared to a classic Power Soak, but achieves the same if not better sounding results. Therefore it is helpful to understand the way it works:
Sound:
When the MASTER VOLUME is turned up high, the Nanotube together with the special Class-D power amplifier is driven hard. It goes into saturation and begins to change its sound properties - just like a classic full-tube amplifier. The resulting "fat guitar sound" is very popular with many guitarists. But it's also very loud! The power and thus the volume is simply too much, and therefore should be reduced. To keep the guitar amp "cranked” with a reduced volume, the Power Soak was invented.
Volume:
A classic Power Soak converts the power applied to the loudspeaker output to heat via large load resistors. The more signal that is sent through the resistors, the quieter, but also flatter and lifeless the sound becomes. Big transformers and more expensive components are used to emulate the load of a real speaker, to make the sound more alive when using a POWER SOAK.
The POWER SOAK in the AMP1 reduces the power over the operating voltage, and thereby reduces the volume of the amp. In this way, you can also produce the sound of an overdriven power amp at a lower volume. The POWER SOAK is completely sound-neutral in the "STAGE" range (100 watts to 7 watts, control range of the pot from 12 o'clock to maximum) since there is no resistance to interfere with the natural interaction of the power amplifier and loudspeaker.
If you do not hear a volume difference in the two ranges, this is because the MASTER VOLUME control on the AMP1 is not turned up far enough. The POWER SOAK only reacts if sufficient operating voltage is reached by turning the MASTER VOLUME on the AMP1 to at least 6 or 7.
So: Turn up MASTER VOLUME to at least 6 or 7 and then turn the POWER SOAK down until just before 12 o'clock, and then you can hear the POWER SOAK working and also the sound reduction. If this is still too loud, you can control the POWER SOAK beyond the 12 o'clock position in the HOME range area.

Video about this topic

Yes, firmware updates are available. However, these relate only to the switching operating functions of AMP1. Since the sound of the AMP1 is 100% analog, it remains unaffected from firmware updates.

The AMP1 is MIDI-capable and can be controlled by external MIDI devices. To do this, you need our MIDI1 adapter, which allows you to connect a MIDI controller to the AMP1.

Video about this topic
I would like to use the AMP1 together with an external MIDI effects device. I would like to use the effects of the external device and simultaneously control the AMP1 via MIDI commands (Program Change and Control change) from the effects device. Is that possible?
Yes, this is possible, depending on the midi effect or midi controller device. The AMP1 can handle program change commands as well as control change commands from an external MIDI controller. The controller must be connected to the AMP1 via the MIDI1 adapter.
With the help of program change commands, all 4 channels, BOOST and REVERB can be switched on the AMP1. Additionally MASTER VOLUME, POWER SOAK and GAIN can be changed via midi control change commands. To use the audio effects of the external MIDI effects device, the effect device must be integrated into the signal chain (before, or into the FX loop of the AMP1) using instrument cables. The MIDI (foot) controller sends a program change number, which can be assigned to a specific effect on the midi effect device, while AMP1 switches to a desired setting simultaneously by receiving midi data.
Using MIDI1, my midi-controller device cannot control the AMP1. What am I doing wrong?
First, make sure that your MIDI-controller sends program change commands to midi channel 1, and not to all 16 midi channels (omni). This prevents multiple program change commands from being received simultaneously by the AMP1. The MIDI LEARN function allows you to assign switching settings on AMP1 for each incoming MIDI program change number. This is done as follows: Connect your MIDI controller to your AMP1 using the MIDI1 adapter. Select your desired sound on the AMP1 (channel, boost on / off, reverb on / off, etc) - tone control and custom control settings cannot be stored. Press and hold the boost button until it flashes. The flashing indicates that MIDI Learn is active. If a MIDI program change command is sent now, the AMP1 saves this command with the settings on the AMP1. The result: every time this program change number is received via MIDI, exactly these settings are recalled from your AMP1.
When controlling the AMP1 via MIDI, some settings are automatically activated for each program (patch), which I have not been programmed (POWER SOAK or / and 2ND MASTER VOLUME are activated, CLEAN VOLUME or GAIN are reduced etc.), although all Control Change Commands are off. What am I doing wrong?
Obviously, there are "unwanted" values in the memory of the AMP1 (e.g., by testing in the store, etc.). These can be corrected (deleted) by a Factory Software Reset. To do this, press and hold all three foot switches and then turn on the power.
When controlling the AMP1 with my MIDI board, POWER SOAK and GAIN are automatically reduced with each Program (Patch) change. What am I doing wrong?
Obviously, the MIDI board sends control change commands. Please make sure that all control change commands are set to off, or with activate control changes, the maximum value is retrieved.
I´m having problems sending MIDI Program Changes from a MIDI controller (Roland ES-8) to AMP1. It seams that the Midi-Learn function isn't saving MIDI Program Changes correctly. I can correctly send PC messages to my Eventide H9, but the AMP1 doesn't respond to them.
Many MIDI controllers are able to send several MIDI Program Changes on separate channels, so they can control several MIDI units each on it own MIDI chanel. It is important, that you address every MIDI unit in your system with a separate MIDI channel. You have to make sure that for each patch your controller sends the right PC message on the right channel.
Use MIDI Channel1 and send a PC message from your controller to match your controller patch with the setting of AMP1 using MIDI Learn on AMP1.
Check:
If you use the midi 1 adaptor and any switching is happening - the cable and amp1 work.
If there is only 1 midi command coming in from each patch of your controller to AMP1 it will work perfectly.
Here is the feedback from a customer how he found the solution with his ES-8:
It was totally an ES-8 issue.
"I got the ES-8, Amp1 and H9 all playing nicely together, at last! The solution was quite simple, if not completely obvious, at first. When you write a patch on the ES-8, you enter 'Patch MIDI (1-8) and then on the next screen you select your MIDI channel, PC#, etc. I tried using Patch MIDI1 at first and when that didn't work, I tried Patch MIDI2 & Patch MIDI3, also no luck. Today, just for fun, I tried using Patch MIDI8, MIDI Channel 1 (Amp1 only works on this channel) lo and behold, it worked! Next, I tried sending some PC commands to the H9 on MIDI Channel 2 (as configured in the H9 settings) and it didn't work. So I switched to Patch MIDI7, MIDI Channel 2 and that did the trick as well. So now, on a single patch, I've got the Amp1 channel/boost/reverb setting as well as the H9 program that I desire and of course all the analogue pedals are easy to punch in and save there as well.”
As a follow-up, I’ve also got the CC gain control working as well.
I’m using MIDI1 to send CCs to the AMP1. I have my MIDI controller set up to use MIDI channel 1, and I use CCs 007, 020 and 030 to try to change master/powersoak/gain. But the AMP1 doesn’t seem to receive them. Sending PCs to select different channels, boost, reverb works fine. What’s wrong?
First of all: If the PCs switch the settings of the AMP1, then MIDI (including CCs) works. So the problem is not the AMP1 or the MIDI1, but the MIDI controller. MIDI uses 0 - 127 to encode the CCs, but some equipment (for example the Harley Benton FXL8 PRO) use numbers 1 - 128. So if you add 1 to the CCs in the AMP1 manual and use these values, you can adjust master/gain/powersoak. So for example, you set the FXL8 to CC008 to adjust the master volume, CC021 for gain, CC031 for power soak.
I have problems switching my AMP1 via MIDI. I use a BOSS MS-3 / Line6 HX Effects.
The AMP1 MIDI logic is so easy! In 99,9% of all cases the sending MIDI device is the cause of a switching problem. This is now to proceed when programming a patch meaning to switch the AMP1:

You can turn the booster as far as you want! Nothing is damaged in this way, the Nanotube is working at the RETURN of the effect path. It can handle this power, but it will start to distort at higher boost levels. If you do not want this to happen, you should make sure that the Booster is not exceeding a few db boost.
To enable the largest possible headroom, press the push-push switch on the bottom of the AMP1 to control the sensitivity of the FX loop (+ 4dB).
The better solution is a "minus booster" since it is sound-neutral. A second, lower volume can be recalled by means of a minus booster switch, which is then your rhythm level. If you switch off the minus booster, the full level is ready for solo use.
When the BOOST is activated, the signal is muted for a short moment. Is that normal?
Since the signal path in the AMP1 is 100% analog, "popping" noises occur in various switching processes. Especially the boost function is very critical. Therefore the signal is muted for about 4 ms when switching the boost.
Video about the topic
 Does AMP1’s class D power amp sound more like a Class A/B tube amplifier, or does it sound more like a single-ended Class A amp?
Class D is just a technology to reduce internal heat. The harmonics in AMP1’s power amp are naturally generated by tube and analog circuitry, in best composition of A + A/B, just like in traditional tube amplifiers. These are even switched for the AMP1’s four different channels.

The FX Loop Level Switch sits as a push-push switch in the recess. It can be reached by means of a thin elongated object, e.g a screwdriver. But please just press it - do not turn it!
I am using several devices in the FX loop. Some I want to use in serial, others in parallel mode. For this, I switch the FX loop on the AMP1 to SERIAL and use an external additional device (Lehle Parallel), which adds an additional parallel loop. Is this also possible without additional equipment?
No, this is only possible with additional equipment.
I prefer to work with a volume pedal than with the volume knob on the guitar. How do I connect the volume pedal in this case? Before the INPUT on the amp, or the FX loop?
The placement of a volume pedal in the signal chain will have an influence on the function of the pedal. Any change in the volume of the signal before the INPUT of the amp has an effect on the overdrive of the preamp. If you want to use a volume pedal to replace the volume knob of the guitar (like a Gain control), it must be placed before the amplifier's input. If you want to control the master volume of the amp without affecting the tone or gain, the pedal must be looped after the preamp in the effect loop in serial mode. Both versions are used by different types of guitarists, it is just a matter of what you prefer.
How can I control the effects level of an effect, when I use my Effects device in the loop set to parallel mode? Is there a dry / wet control on the AMP1? If not, can I control it with a volume pedal?
The FX level cannot be controlled directly on the AMP1. Therefore, the amount of effect must be directly controlled on the effects unit via the volume on the device. If this is not possible on the effects unit, you can use a volume pedal, which is inserted behind the effect’s device in the FX loop (switched to parallel mode). With the help of the volume pedal, now the mixing ratio can be controlled (to a certain extent).

The boost on the AMP1 is a two-stage gain boost, which is working in front of the channels. The Custom Control Pot on the AMP1's chassis side controls both gain and volume of the BOOST. Turned up halfway the signal (similar to a treble booster) is more transparent and gets more gain. Beyond the middle position, the boost itself begins to slightly overdrive (similar to a tube screamer). A moderate boost in volume is associated with this. For a sound-neutral increase (or decrease) of the volume, AMP1 offers a 2ND MASTER VOLUME function. This can be accessed via the REMOTE1 or Midi. Alternatively, you can use a minus booster or a volume pedal in the effect loop (switched to serial) to control the overall volume.

The EASY LOCKs are strong neodymium magnets for mounting the AMP1 e.g. on a pedalboard. They are screwed onto the board and form the counterpart to the magnetic metal plates which are mounted on the underside of the AMP1. With a correct and proper assembly, the EASY LOCKs hold a load of up to 10 kg. which is more than sufficient for the AMP1. With the help of the EASY LOCKs, the AMP1 can be installed and disassembled very easily. You can take it along for a little club gig or put in the guitar Gig Bag, clean and easily removed for later mounting again on the board.
It is important to install the EASY LOCKs correctly for the best magnetic contact, especially paying attention to the correct distance between the two magnets. For this purpose, a drilling template is available at https://www.bluguitar.com/service.html. On some surfaces, it is helpful to screw the Easy Locks a little looser, so they can have 100% contact to the metal plates on AMP1.
Video about the topic


The AMP1 can not be modified or updated to Mercury Edition, because the ladder is equipped with a different PCB and some different hardware components.
Can the original AMP1 be exchanged for an AMP1 Mercury Edition?
The AMP1 Mercury Edition is equipped with a different PCB and some different hardware components, and it costs a little bit more that the original AMP1. That's why it's not possible to exchange the original AMP1 for an AMP1 Mercury Edition.


How does the factory reset work with REMOTE1?
The factory reset of the REMOTE1 works as follows: Disconnect the REMOTE1 from AMP1 by removing the jack cable, thus interrupting the power supply of REMOTE1. Then press buttons 1, 6 and 7 on the REMOTE1 and keep pressed while re-inserting the jack cable. Release the three foot switches. If preset 1 is active now on REMOTE1, the reset procedure was successful.
How do I switch the REMOTE1 into MIDI mode to control external MIDI devices?
The REMOTE1 works with MIDI in a very simple way. Therefore, you do not need to activate any mode. MIDI-Program-Change commands are always present in parallel to the presets at the MIDI OUT socket (see owner's Manual).
How can I use the REMOTE1 to control MIDI-capable external effects?
To connect external MIDI-capable effects with the REMOTE1, connect the REMOTE1's MIDI OUT jack to the MIDI IN of the external effect’s device. Please assign a preset on your effects device to the program change command sent by the REMOTE1. Refer to the REMOTE1 Owner's Manual for a table of MIDI allocations.
Depending on the respective effect device, this is done by programming the desired effect to the respective preset number. Some effects devices offer MIDI mapping or MIDI Learn. In any case, make sure that your MIDI device is set to MIDI receiving channel 2.
How do I save settings to a preset in an external MIDI effect device connected to REMOTE1?
These memory allocations must be performed on the external MIDI effect device, as the REMOTE1 sends fixed program change command numbers directly connected to their presets.
When I set a 2ND MASTER VOLUME for a particular channel in Direct Access Mode and then switch it to another channel, the value of the 2ND MASTER VOLUME remains the same. Why can I not set different 2ND MASTER VOLUMES for different channels?
In direct access mode, you have direct access to all switching functions. 2ND MASTER VOLUME, FX loop ON / OFF, REVERB and GAIN are superordinate functions, which are not switched off or changed when switching the channels. The reason for this: The volume of the 4 channels can be matched using the Custom Controls or CLEAN VOLUME and OVERDRIVE MASTER on AMP1 itself. If the balance of all channels is working for you, you can adjust and recall a Second master volume for all channels on the REMOTE1. Usually, this works fine as a rhythm and solo volume for all channels. If you want different levels of the second master volume per channel, use the preset mode. Here you can control and store the level of the 2ND MASTER VOLUME per preset.
If you need different 2ND MASTER VOLUME levels for the individual channels, please use the Preset Mode, which allows you to store an individual 2ND MASTER VOLUME level for each preset.
After I have connected the REMOTE1, I get a loss of volume.
In the REMOTE1, gain, master volume and Powersoak can be reduced and stored. If a loss of volume occurs when the REMOTE1 is connected, this is due to the fact that the currently active preset has a reduced value for one (or two or all three) of the parameters. If the volume loss is unintentional, the three parameters should be re-stored with the volume control turned up to full. With a reset of REMOTE1, all values will also be set to MAX. However, any previously saved user presets are replaced by factory presets.
If the AMP1 does not deliver 100% volume, gain or power (Soak) without REMOTE1: connect the REMOTE1 and turn all parameters to full before you disconnect the two devices and / or switch off and then disconnect.
You could also do a reset on AMP1 if the AMP1 does not deliver 100% volume, gain or power (Soak) without REMOTE1.
Can I control two different MIDI-capable devices simultaneously with REMOTE1 in addition to switching functions on the AMP1?
Yes, this is possible in the preset mode with REMOTE1! The REMOTE1 sends a fixed MIDI program change command for each preset on MIDI channel 2. This can be taken from the MIDI OUT socket of the REMOTE1. If you connect a MIDI effect device to this jack, you only have to assign the desired effect to the program change command that is sent via MIDI. For the integration of a second effect device, this must be connected to the MIDI THRU socket of the first effect device. Also in this second effect device, the same program change command of the REMOTE1 needs to be assigned to the desired effect preset for this device. In this way, two different MIDI-capable devices will switch simultaneously.
When in Direct Access mode, the BOOST switch of my REMOTE1 does not react when pressed down, but only when it is released. Why is that?
When the REMOTE1 is operated in Preset mode, all foot switches react when pressed down. As for the operation in Direct Access Mode, some of the switches do not react before the are released. There is a simple reason for that: some of the switches (BOOST, FX-LOOP) have a second function, which can be activated by pressing down and holding the switch for a few seconds. So pressing down the switch and instantly releasing it triggers a different operation than pressing the switch down and holding it. This is why the operating of these switches is not initiated when pressed down, but when released.

No, the LOOPER KIT is a true Bypass Relay Switcher for the audio signal. The LOOPER KIT has nothing to do with the power supply of the pedals.
I would like to activate an effect pedal in the FX loop of the AMP1 and at the same time a second effect pedal, which is plugged into loop 1 of the LOOPER KIT that works in front of the AMP1. Is this possible?
This is possible. For each preset REMOTE1 can memorize "on - off" of the FX loop of the AMP1 as well as for each of the 4 loops of the LOOPER KIT. The following applies to the example described above:

The dummy coil is activated via the push-push switch on the lower tone pot. When the pot is set to "out" the dummy coil circuit is active. The dummy coil works only on the neck and bridge pickup. If the middle pickup and settings are selected via the 5-way switch, it is automatically switched off since the center pickup is "reverse-wound" and the dummy coil is not used here (it would actually increase the hum). Thereby 4 of the 5 sounds are hum reduced, except for the middle pickup only position.
When the push-push pot is extended, the trem-arm volume pot gets stuck. What can I do to fix this? Is Teflon tape an option?
Teflon tape is generally a good idea since it prevents the thread from wearing out. In addition, it suppresses background noise, but it does not change the angle, which must be changed depending on the setting of the vibrato arm, so that the vibrato arm no longer hits the "extended" tone pot. You can fix this problem by bending the trem-arm. To do this, clamp the arm on the thread side with two wooden plates in a vice and then bend the long part of the lever - at the end, a minimal modification is enough. The lever should only be bent so far that it just rests over the pot. Otherwise, it will be too far away from the scratchboard. In doing so, the angle of the vibrato block (from supported to free-floating) plays an important role. Thomas Blug has adjusted the block so that the G string can be "pulled" by the tremolo to a minor third. He used this as a guide to adjust the tremolo arm.
Does the neck have to be removed to adjust the neck?
As with most "vintage Fenders", the truss-rod is only accessible from the pickup side. If you loosen your neck, you can raise it slightly and change the tension of the truss-rod. You do not have to remove the neck completely. The strings can be fixed with a capo on the first fret during this operation.
The vibrato is set at quite a steep angle. How can I adjust this to a lower angle?
Thomas likes this slightly larger angle, this is why the vibrato is adjusted this way in the factory. To make the vibrato flatter, the claw on the back has to be screwed in deeper.
If one of the screws will no longer screw into the wood. Can you do something about that?
There is a home remedy, which has already been used in countless old vintage guitars: Just put a toothpick or a match in the screw hole and break it at the edge. If you now put the original screw back in the hole, this will hold the screw in place, just like new.

There are several ways to integrate BluBOX into your setup:
The BluBOX can be inserted between the SPEAKER OUT of the amp and the speaker cabinet for excellent recordings without complex microphone Techniques. Thus the mic, the microphone stand as well as all negative side effects such as crosstalk and unwanted vibrations will disappear. What remains is a consistent very good sound in any situation. The BluBOX is simply connected to a mixer like a microphone with a microphone cable. As with a "real" microphone, the transformer integrated in the BluBOX prevents potential hum. Of course, you can also use the signal of the BluBOX in combination with a guitar-cabinet that is miked up with a microphone.
If you do not want to use a guitar cabinet and still want the beloved sound of a tube amplifier with full power without compromises, you can use the BluBOX with the beloved tube amplifier and instead of a guitar cabinet connect a load-box. The load-box is quiet, turns the power of the amplifier into heat and prevents the tube amplifier from being damaged.
The special thing for AMP1 users is that they can connect the BluBOX to the loudspeaker output of the AMP1 and can use this combination without any loudspeaker or load box connected to AMP1´s speaker out. The AMP1's unique and innovative power amplifier is ideally suited to deliver all sounds - even fully turned up to saturation - without a load from a connected loudspeaker box or load box. The guitar-cabinet sound comes from the BluBOX. Although the BluBOX is designed for use with guitar amplifiers, it also delivers fantastic direct sounds with pedals or preamplifiers. Just connect the last pedal of your pedalboard or the line out of your preamp to the LINE INPUT of the BluBOX, and do without a guitar amplifier. More compact than this is not just not possible!
If I use the BluBOX with a classic tube amplifier, do I need to connect the SPEAKER THRU of the BluBox to a load-box or guitar cabinet?
Yes, with classic tube amps it is essential! Traditional tube amps always need a load in the form of a guitar cabinet or a load box. The BluBOX does not have a load built in. In other words, it is a speaker simulation combined with a DI box. Therefore, a guitar cabinet or load box must always be connected to the SPEAKER THRU of the BluBox when using a traditional valve amplifier. An exception is the AMP1, which can be operated without a load of a loudspeaker or load box. The unique, innovative power amplifier of the AMP1 is ideally suited to deliver all sounds - even fully turned up to saturation - even without a loudspeaker box or load box connected.
My amp has a 4, 8, and 16-ohm output. What does BluBOX do with it?
The BluBOX does not represent a load resistor. The signal is directly looped through from the SPEAKER INPUT to the SPEAKER THRU. This means that the load resistor connected to the SPEAKER THRU must correspond to the impedance required by the amp.
What is the difference between the BluBOX and the Two Notes Torpedo C.A.B.?
The BluBOX offers 16 different speaker simulations including appropriate microphoning, but does not include preamp simulations or reloadable impulse responses. The BluBOX deliberately offers less modifiable parameters. The presets are based on Thomas's years of experience. With only two controls it is reduced to the max for intuitive and easy stage use. So it is almost impossible to get bad results.
Unlike the Torpedo, the BluBOX includes a DI box with a transformer, which prevents hum problems both in live mode and in the studio.
The XLR-OUT and the HEADPHONE OUT of the BluBOX are only generating a „pock-pock-pock“ noise. Is the BluBOX faulty or damaged?
There are two possible causes for this:
1.) The power supply used is an AC power supply. In this case, "AC" instead of "DC" is indicated somewhere on the power supply.
2.) The supply voltage is plus and minus reversed. Another power supply should be used. The BluBOX needs 9 to 18 Volt DC, center negative. BOSS power supplies work.
What cable do I need to connect the AMP1 to the BluBOX? Does it have to be a speaker cable or can I also use a guitar cable / patch cable?
To connect the AMP1 to the BluBOX, you can either use a speaker cable or a normalguitar cable / patch cable.
The output signal of the BluBOX generates a strong static noise. Is it a defect?
The BluBOX is not adequately leveled. To minimize the noise, the BluBOX must be properly leveled. The 3-step input sensitivity switch is used for this purpose. This should initially be in the middle position. If the input signal is very quiet, the switch should be set to HIGH. If the signals are very loud, you should switch to LOW.
The small LED indicates the level: Green means "level on", red means "maximum leveling".
The LED may at times also be briefly red but should not permanently light red only.
The small LED indicates the level: Green means „input level on", red means "maximum leveling".
When the LED lights up red, a compression effect with a very discreet overdrive occurs. This effect is similar to the sound of a driven loud speaker. The optimal sound to noise ratio is obtained when the LED is predominantly green, but changes with loud signals sometimes between green and red.
You can operate the AMP1 without a load, so it does not necessarily has to be connected to a guitar cabinet if you use the BluBOX with the AMP1.
Does it make a difference to the guitar sound of the BluBOX whether a guitar cabinet is connected or not?
Yes, it has an effect on the guitar sound characteristics whether a speaker is connected or not. A connected speaker brings a bit more bite and bottom.
There is a sonic difference if the loudspeaker is connected to the SPEAKER LEVEL THROUGH of the BluBOX or the second loudspeaker output of the AMP1, since the BluBOX offers two different cabinet simulations: When a loudspeaker is connected to the SPEAKER LEVEL THROUGH of the BluBOX, the BluBOX switches to a different cabinet simulation. Many people prefer this setup to simply run the loudspeaker box on the second loudspeaker output of the amplifier.
You can definitely experiment with these three variations (cabinet on the SPEAKER LEVEL THROUGH of the BluBOX, cabinet on the SPEAKER OUT of the AMP1 or no cabinet at all).
Important! If you use a classic tube amp (eg. Fender, Marshall etc.), always connect a speaker or a load to avoid damage on the amp!
The phones out sounds slightly overdriven when playing clean tones with the BluBOX. How to avoid it?
There is no dedicated output level control for phones on the BluBOX. Different phones produce different volumes. E.g. a Sennheiser HD25 is pretty loud, others might have a lot less volume. To bring up the headphones volume you should not cranck CLEAN VOLUME or MASTER VOLUME on AMP1, since the amp will start to overdrive. Instead please use the input sensitivity switch of the BluBOX on position "HI", and make sure you level AMP1's volumes so that the level indicator shows green and flashes red for peaks. In case your phones are still not loud enough, please use louder phones.
BluBOX is so compact we could not find the room for a dedicated headphones volume control.
I have the Amp 1 which sounds great through my 1x12 cab. I have recently bought the Blubox and use to DI straight into the PA but it sounds really fizzy, nothing like the tone from the cab gain wise.
First of all please make sure that you have the right connections. Please use speaker out from one into speaker level input of the BluBox. Put the input level switch to the middle position, and make sure it is mostly green, sometimes red is not a problem. Select CabType stack 70 (as this sounds balanced and warm) - set Mic position to Center.
Use XLR out to your microphone input of the PA.
Make sure your EQ is that flat. Now you should hear something pleasant. In case you're PA speakers have a boosted high-end you could use the mic position anti-clockwise to reduce the bite.
If you use the Cabinet at the same time with the blue box, you should connected to the speaker level through on the blue box. Make sure the impedance of the cabinet majesty impedance of the output that you are using on AMP1.
If this doesn't sound like a guitar cabinet, we have to check further details:
EQ setting on AMP1.
Make sure you have not too much treble.
Setting:
Bass: 5
Mids: 5
Treble: 3
You can also make extreme settings that will sound good like:
Bass: 10
Mids: 10
Treble: 0
As long you are using mids you'll get a good and healthy sound...it's because there is already treble in the mids.
BluBOX needs a power supply that delivers 9 to 18 volts. Does the voltage of the power supply make a difference in terms of sound?
Yes, there is a marginal difference: A higher voltage leads to a slightly crisper sound, a lower voltage makes the sound marginally softer.
I'm using the BluBOX with my amp, and I now want to buy a load box. Do you recommend any specific model for the use with BluBOX?
A: In terms of impedance, the BluBOX is absolutely neutral, so it has no impact on the sound of your power amp. This means that the load box has to be harmonized with the power amp being used, not with the BluBOX. That is why we cannot recommend a specific load box for the use with BluBOX.
Frequently Asked Questions
GENERAL INFORMATION
Does the AMP1 have a 19 "rack mount version? I would like to install it in my rack.There is no 19 "Rackmount version from the AMP1. However, the AMP1 is so small and so light that it can easily be incorporated into the rack, e.g. In the compartment for the floor pedals or Rack Drawer.
Video Rackmount

Is there a stereo version of the AMP1, or in other words can the AMP1 be operated in stereo?
The AMP1 is built like a classic amplifier and has a mono power amp. For stereo operation, however, you can easily combine two AMP1s with their own separate cabinets. With REMOTE1 and MIDI1, both amps can be controlled simultaneously: REMOTE1 is connected to the first AMP1 via the foot switch connection. The second AMP1 is connected to the MIDI OUT of the REMOTE1 using the MIDI1 adapter. Each switching function of REMOTE1 now affects both AMP1s. Since the output amp changes its sound with the channels, the second AMP1 should be programmed using MIDI LEARN so that the same channels are always active with both AMP1s.
Video mono/stereo
If the AMP1 is connected to a power supply via the power cable and via a box cable to a loudspeaker, it hums quietly but audibly in the box, even if the AMP1 is switched off. Is that normal?

Yes, The power switch of the AMP1 is located in the secondary circuit. As a result, when the amp is switched off, there is no proper disconnection from the mains, as is the case with many modern devices. Strictly speaking, the AMP1 is then in standby. The transformer also builds up its magnetic field in this switched off state, which then goes directly into the speaker and becomes audible. In many other tube amps a similar phenomenon occurs. If that is a problem, one should use a switchable power strip, so that one can disconnect the device by switching it off completely from the power supply.
When the CLEAN channel is active, the LED on the Channel Select switch on the AMP1 changes its brightness depending on the signal level. Is that normal?
Yes. Inside the AMP1 there are LEDs which serve as an optical confirmation for the signal flow and the signal level. These are indicated by a plastic ring around the foot switch for channel selection when the CLEAN channel is activated. This is completely normal and has no effect on the sound. These LEDs are always working, but they can only be seen from the outside when the CLEAN channel is selected.
The AMP1 setup works at home without problems, but on stage there are sometimes feedback problems with the overdrive channels. What can be the cause?
There are several possible causes for such a phenomenon. If the AMP1 works at home without problems, then with certainty we can assume that the AMP1 is not the problem. To find out where the problem comes from, consider the following:
- Is the live setup exactly the same setup as at home?
Additional or other components can be considered a cause of feedback. - Does the feedback also occur when the volume pot of the guitar is turned off?
In this case, the cause of the feedback is somewhere between the amp's input and the speaker. The most obvious reason is then bad or defective cables. Therefore, the guitar cables and the speaker cable should be replaced. - The feedback does not occur until the volume pot of the guitar is turned up.
In this case, feedback is generated between the guitar pickups and the speaker. Microphonic pickups can be the cause. If this is the case, the feedback is lower if the distance between the pickups and the speaker is increased, when the guitar is moved away from the loudspeaker. Likewise, there should be lower feedback if you turn the Treble Pot down on the guitar. - Electrical grounding
The AMP1 - just like any other guitar amplifier - it must always be properly grounded. A missing ground is also dangerous! Please make sure that the correct power cable is used. Sometimes the use of another socket or a different circuit is also helpful.
There are many possible reasons for a humming noise coming from any guitar amplifier. Please proceed as follows to identify the source of the noise:
Disconnect the guitar cable (resp. any cable) from the AMP1’s input, connect a speaker cabinet to the amp and switch the noise gate on. It should be quiet. Then switch the noise gate off. What you’re hearing now is the noise from the preamp(s). Next step: connect a guitar to the amp’s input, and put the guitar volume down. Any change in the noise comes from the cable. Then turn up the volume of the guitar, and you can hear the noise that comes from the guitar.
As a next step you may check all pedals used in front of the AMP1 or in its FX loop step by step, until you can isolate the source of the humming.
Can you use the AMP1 also for Bass Guitar or will it harm the AMP1?
You can connect a bass to the AMP1, like any other guitar amp. It does not sound bad at all! However, the AMP1 is not designed with the power capacity of a bass amp. For guitarists, 100 watts are generally more than adequate. For bassists this is usually not enough power. When selecting a loudspeaker, care must be taken that the impedance of the loudspeaker is NOT less than 8 ohms. When the ohmic load is too low, the AMP1 delivers more power than it’s designed too, AMP1 will overheat and then switch off. It is not broken, thus you will have loss in sound - and that is not desired.
What material are the Homeplate Guitar picks made of and how thick are they? The Homeplate Guitar Picks are 1.5mm thick. The black version is made out of ABS, the blue version is made out of PMMA.
TUBE
When must the tube be replaced? Can I do it myself?The Nanotube is designed in such a way that it has 3 times the life span of a standard ECC83 tube.
The Nanotube has a slightly lower operating voltage compared to it´s conventional use, and as a result of this it has a smoother characteristic curve, and thereby a significant sound improvement. This also doubles or can even triple the life of the Nanotube. In addition, there is no contact problems with the socket on our tubes. Traditional tubes are mounted on a socket base, while the Nanotube is soldered directly onto the PCB. Because of this feature a failure of the tube is highly unlikely. The nano tube will never need to be exchanged.
More
Concept AMP1
Is the AMP1 like a tube amp? Does the AMP1 go to the (power)amp distortion / saturation?
Yes, the AMP1 behaves in the same way as known tube amps. By increasing the master volume, the AMP1 goes into saturation like a classic all-tube amplifier and also produces amp saturation and with high driven settings even power amp distortion.
More about the concept and the structure of the AMP1 is available in this video
Concept AMP1
With a higher MASTER-setting (from approx. VOLUME 5 and MASTER 5) of my AMP1, a "bell ringing sound" can be heard when switching or when I tap on the housing near the tube. Is that normal?
Yes, this is normal for tube amplifiers. If you tap on the chassis of any other tube amplifier (e.g., Marshall, Fender) at this volume, you always hear a slight noise from the tubes.
OPERATION / PROGRAMMING
How does the AMP1 factory reset work?The factory reset for the AMP1 works as follows: Turn off the AMP1, hold down all three foot switches on the AMP1 and turn the AMP1´s power back on again. Then release the three foot switches.
Can the Custom Control and EQ settings be stored for each preset?
No, the settings cannot be saved. They are set on the AMP1 and are used for all presets accordingly. The channels of the AMP1 are matched to one another in such a way that they provide a similar frequency spectrum. This makes the sounds of different channels sound better together; the guitar retains its "frequencies" while playing with other instruments in the band, and remains always present during sound preset changes.
Can Gain and Volume settings be stored per preset?
The settings can only be saved by using REMOTE1 or MIDI. If you use the AMP1 “standalone", these parameters are set on the AMP1 and used for all presets accordingly.
The foot switch of my AMP1 does not react when pressed down, only when it is released. Why is that? Can I change that?
When the AMP1 is operated in Direct Access mode, all foot switches react when pressed down. Depending on the software version of the AMP1, there are differences for the operation in the Preset Mode: In an early software version, the switches did not react when they were pressed down, only when released. In the meantime, there is a newer software, in which the switches react as soon as they are pressed down. All new AMP1s are equipped with this software. If you use the preset mode a lot and have an AMP1 with the old software, we offer a chargeable software-update.
Please contact our service department: service@bluguitar.com.
Is it possible to access all 4 channels without the REMOTE1 or MIDI? If so, how does it work?
 You can connect on the foot switch connector of the AMP1 not only the REMOTE1 or the MIDI1 adapter, you can also connect a normal *1. 2-way foot switch with a stereo jack. * 2. The two switches on the external foot switch then CLEAN / OVERDRIVE and BOOST on / off (the respective functions of the left and the middle internal foot switch of the AMP1). If you use AMP1 in Preset Mode, with the three internal foot switches having a different Overdrive channel (eg. VINTAGE for the left, CLASSIC for the middle and MODERN for the right internal Footswitch) (alternatively with BOOST or / and REVERB on or off), the double foot switch is used to access the CLEAN channel, and thus you will get to all 4 channels. With the second switch of the external Footswitch you can still switch BOOST on and off per channel.
 *1: Not all foot switches work with AMP1. See "Functionality with other devices"
*2: A mono foot switch is also usable. This then switches between Clean and Overdrive, thus taking over the function of the left internal foot switch of the AMP1 in Direct Access Mode.
Video on the topic
If I activate the BOOST in the Preset Mode with the help of an external foot switch, it will automatically switch off when switching to a different preset that was not programmed with BOOST. If I switch with the external foot switch between CLEAN and OVERDRIVE, it remains activated. Why is that?
The external foot switch is not part of the "Learn" function in the AMP1. When a preset is recalled using one of the three internal AMP1 foot switches, the AMP1 automatically activates the switching functions stored on this memory — including BOOST and Reverb on / off. The external foot switch always has the same two functions, regardless of the settings stored in the currently activated preset: Change between CLEAN and OVERDRIVE and BOOST on / off.
When I use the CLEAN channel with the boost to get a fat crunchy tone, the CLEAN channel is always louder that the VINTAGE channel resp. the overdrive channels. How can I correct that?
Get a „minus booster“ (a passive volume potentiometer) or a volume pedal to reduce the level - use it in the serial FX-LOOP. This can reduce the volume for the clean channel when you use it overdriven.FUNCTIONALITY WITH OTHER DEVICES (EQUIPMENT PERIPHERAL) (Integration and setups)
How to combine AMP1 with (digital) multi-effects?The best way to do this is to use the 4-cable method. The pre-effects (booster, distortion, compressor, etc.) of the multi-effect device run into the input of the AMP1, and the loop effects (reverb, delay, modulation effects, etc.) run into the FX-Loop on the AMP1. This gives you “the best of both worlds": a fully analogue based sound combined with the flexibility of digital effects.
Here Thomas explains how its done.
Can I use other distortion pedals / boosters?

Yes, as with other tube amps a distortion or booster can be used with the AMP1. In particular, the channels CLEAN and VINTAGE have been designed for combination with other pedals.
Why do not all foot switches work with LEDs?
The switching process using the foot switch connected to the REMOTE-socket of the AMP1 is performed by measuring the voltage at this socket. Foot switches without LEDs always work. A foot switch with a LED without an internal resistor also works. In the case of foot switches with LEDs the resistor can be too big, so that the voltage drop is not sufficient to trigger the switching operation.
I use a digital preamp in combination with a transistor power amplifier. Can I connect the preamp to the FX RETURN of the AMP1? Will my sound be more vibrant and will I get more a tube sound and feel?
The power amp of the AMP1 behaves and sounds like any classic tube amplifier. The signal of the preamp will of course be more alive. Due to the digital preamp, the signal still remains somewhat more compressed compared to a full-tube amp or the AMP1. But if you like this pre-amp sound, the AMP1 power-amp will certainly give you more "Tube feel" and help you feel good about the sound.
Can the AMP1 be used as a pure overdrive pedal?
Even if the AMP1 has been designed as a complete guitar amplifier with preamp and power-amp, it can be "misused" as an overdrive pedal. Due to its format as a floor pedal, it is actually also well-suited as a "noble distortion".
Use the FX-send directly into the INPUT of another guitar amplifier. The Treble setting of the AMP1 should be set to low, because the second amplifier generally boosts treble. In addition, the FX loop level switch on the bottom of the AMP1 should be set to "LOW" position to avoid an excessive output level. In order to avoid possible hum that is created by ground loops, you can use a DI box (for galvanic separation) between AMP1 and the second amplifier.
Video on the topic

Will a clean boost pedal in the FX loop work fine for 2nd master volume respectively solo boost?
Yes, it will work, as long as you witch the FX loop to serial mode. But please mind a few things: If you boost volume in the FX loop, you will not only increase the volume, but you will also saturate the tube driven power amp stage. Result: the sound will change. So if you’d like a second volume for rhythm/solo level without changing the sound, then you better use a volume pedal or a minus booster to reduce volume instead of increasing it.
Please also keep in mind that the FX loop can be set to two different volume levels. Use the push/push level switch on the bottom of the AMP1, because this can also change the sound of your pedal in the loop.
When using my AMP1 with an HX Effects in 4 cable method, I get a strange noise on the overdrive channels, especially in VINTAGE and CLASSIC. What’s wrong there?
This is not an AMP1 issue, it’s an HX Effects issue, and Line6 eventually fixed it in the latest version of the HX Effects. So this noice only occurs with an older version of the HX Effects. It’s coming from the HX Effects’s pre-loop. Make sure you switch that loop to instrument/sensitive, this is going to help either way. Please contact Line6 if can’t get the issue fixed!

CABINETS / SPEAKER OUT
Can the AMP1 be operated without a cabinet or load box without causing damage?Yes, this is possible. The AMP1 will not be damaged without a connected loudspeaker cabinet. Simply connect the REC OUT jack of the AMP1 to a PA system or headphones without using a loudspeaker cabinet. You can also increase the saturation on the power-amp (Master 5 to 7), in order to get an even fatter sound.
Which speakers (or cabinets) are recommended for AMP1?
AMP1 has been voiced for use with classic guitar speakers in the style of Celestion Greenback and Vintage 30s. Of course, depending on your taste other speakers can also be used. For the best sound with a compact design, we recommend BluGuitar NANOCAB and BluGuitar FATCAB.

Do I have to consider the capacity (watts) of my speakers when connecting my cabinet?
Yes, AMP1 can deliver the power of 100W. If the volume is too high you can damage the speaker. The MASTER controller behaves in such a way that position 5 produces approx. 25-watts, position 6 approx. 40-watts, position 8 approx. 70 watts and position 10, 100 watts of power. More importantly, the impedance of the loudspeaker should not be less than the impedance specified on the SPEAKER OUT jack on the AMP1, since the AMP1 can even produce more than 100 watts of power if the impedance is too low. This can be very dangerous for the loudspeaker. There´s a simple rule how to detect the speaker´s limit. Turn the volume up until the sound is getting no more louder, but muddier. Roll back a bit and your speaker is safe. Hundreds of AMP1 are used with just one single BluGuitar cabinet (rated at 60 Watts) without any problem or damage. Just follow the simple rule: Do not turn the volume higher when the sound is getting no more louder! (approx.7 Master on AMP1 in combination with NANOCAB or FATCAB)
How can I connect multiple speakers to AMP1?
AMP1 has two loudspeaker outputs: 8 Ohm and 16 Ohm. If the impedance of the cabinets matches the output of the AMP1, the AMP1 produces the full output power: 100-watt sinus / 150-watt peak. If you use two 16-ohm speaker cabinets, connect them in parallel. This way you will get a total load of 8-ohms, perfect to be connected to the 8-ohm output on the AMP1. If you have two 8-ohm loudspeakers, connect both loudspeakers in series. Then we get 16-Ohm as our total load, perfect to be connected to the 16 ohm output on the AMP1. If you have an 8 ohm and a 16 ohm loudspeaker cabinet, connect both speakers in series. This way we get 24 Ohm as our total load. This connection should be used on the 16 ohm output of AMP1. The power-amp still produces about 80 watts. With the extra volume of the two loudspeakers, it will be louder. And the power-amp of the AMP1 works under perfect conditions. If you connect both speakers in parallel, you get an impedance of 5,333 ohms. In this case, the power-amp could produce peaks that can exceed the150 watts limit of the power amp. The overload protection would turn off the sound for milliseconds - and that’s not what we want. When using a 4x12 " with a 4 to 16 Ohm switching option, make sure that it is set to 16 Ohm and is connected to the 16 Ohm output on the AMP1. This way you can be sure that there the built-in protective circuit cannot be activated, creating a "loss of sound".
Both NANOCAB and FATCAB have a power rating of 60 watts - AMP1 can deliver up to 100 watts. So you should turn the MASTER control not higher than 7 without risking damage to the loudspeaker of the respective cabinet. Why does BluGuitar not produce a 1x12 "box with a 100 watts speaker?
The question of the power handling of the BluGuitar loudspeakers is quite justified. However, there are actually good reasons for designing the two speakers in NANOCAB and FATCAB in a 60 Watts version. If there was a 100-watt loudspeaker that would correspond to our (or Thomas Blug’s) sound ideals, then we would use it. We found a physical problem that cannot be changed: 100-watt speakers need a larger 2-inch voice coil. Due to the size of the voice coil, the membrane of the loudspeaker will inevitably become stiffer, and this is at the expense of sound (especially at low and medium volume). The BluGuitar speakers have a smaller voice coil that makes them sound much more alive and consistent especially at lower volumes. However, this smaller type of voice coil can only handle 60 watts. The BluGuitar speakers have the liveliness of a Celestion Greenback and are almost three times as strong. They withstand the load of a loud AMP1 very well. Master settings over 7 on the AMP1 will make the loudspeaker (one Nanocab or one Fatcab) simply not get any louder. If you turn the master up beyond this point, you will actually destroy the BluGuitar loudspeakers during continuous operation. If you need even more volume you should use an extra speaker cabinet. Our experience is that both NANOCAB and FATCAB are so loud in use that even large open air stages can be filled with sound adequately, as long as you don't play Heavy Metal. If a single BluGuitar cabinet is actually too quiet for you, then you should use two cabs. The combination of 2 NANOCABS or 2 FATCABS or one NANOCAB and a FATCAB (Thomas Blug’s personal favorite) is extremely loud, and sounds also really good. In addition when using 2 cabinets you can increase the spread of your sound much better on stage by putting one cabinet behind you, and a second beside you.
Can I run the AMP1 with a load box (e.g., Palmer ADIG-LB)?

Of course, the AMP1 can be operated with a load box if you want to use the signal of the speaker simulation from your load box. In addition to the speaker simulation on your external load box, one can also use the internal speaker simulation from AMP1. In this way, two different speaker simulation signals are obtained and can be mixed together — like a speaker cabinet with two different loudspeakers. In this context, we also recommend our BluBOX VSC speaker simulation, which offers 16 legendary speaker/microphone combinations using high-end convolution technology. Unlike amps with a traditional tube power-amp stage AMP1´s innovative power-amp works even without a load, without damaging the power amplifier. AMP1 in combination with the BluBox will give you countless outstanding direct sounds and even for silent recording.
Are the BluGuitar cabinets also compatible with other manufacturers' guitar amplifiers?
Yes, sure, that goes without saying. NANOCAB and FATCAB are conventional guitar cabinets with 60 watts of power and an impedance of 8 ohms that can be connected to any guitar amp, and they also deliver excellent sounds with other amplifiers.
RECORDING OUT
Can I connect AMP1 directly to a mixer? If so, is the sound as good as a miked-up guitar cabinet?AMP1 works with a very complex full analogue speaker simulation. The RECORDING OUT signal can be connected directly to a mixing console. A total of 7 different filters reproduce the sound characteristics of a guitar cabinet. The signal sounds open and fresh without scratching sounds and delivers a powerful bass without booming. This is as good as it gets with analog speaker simulations. The sound quality of a direct recorded speaker box with a good microphone and the correct microphone positioning cannot be achieved in this way. Nevertheless, the RECORDING OUT of the AMP1 provides a very good signal, which gives you great results live and in the studio.
If you want to get even closer to the sound of a miked up box, without having to use a cabinet, you should use devices that work with digital impulse response speaker simulations. To get an unfiltered signal for this kind of application, use a DI-box with a PAD attenuation function direct on the speaker output of the AMP1 to reduce the speaker signal level to line level. Highly recommended is our BluGuitar BluBOX, a professional Impulse-Response-Speaker simulation in the Form of a DI-Box-with a virtual collection of 16 legendary cabinets.
Video on the topic

Can the speaker simulation for REC OUT be switched off?
No, this is not possible. There is always a speaker simulation when using the REC OUT connector. An unfiltered line signal can be taken from the FX SEND or even better using a DI box with PAD attenuation function on the SPEAKER OUT.
Is the REC OUT on the AMP1 a mono or a stereo jack?
The REC OUT on the AMP1 is a stereo jack.
Does the REC OUT sound better if I have a speaker cabinet connected to the SPEAKER OUT and thus create a negative feedback in the power amplifier?
When a loudspeaker is connected to the AMP1, the negative feedback provides in fact, a little bit more punch and bite for the REC OUT signal. However, a resonance filter in the bass frequencies also works in the REC OUT, which gives the signal even more vitality and punch when no loudspeaker is connected. The differences are therefore marginal.
What kind of cable do you recommend to connect REC OUT of the AMP1 directly to the P.A. or to a mixing console?
The REC OUTPUT jack socket on the AMP1 is balanced, which can drive long cables without interference. When using mono jack plugs, it becomes unbalanced. So an unbalanced jack/jack signal cable is good enough to connect the REC OUT to the LINE IN of a channel strip on a mixing console. For longer cables, the use of a DI box is recommended to avoid signal losses due to unbalanced cables that are too long. In addition, the use of a DI box is generally also recommended to avoid unwanted hum. In this case use a short (unbalanced) signal cable to connect the REC OUT of the AMP1 with a DI box and connect the DI-box to the MIC IN of the channel strip on the mixing console with a (symmetrical) XLR microphone cable.
In order to saturate the NANOTUBE in the power amplifier of AMP1, the MASTER VOLUME must be turned up very high. Can the saturation of the NANOTUBE also be heard when using the REC OUT?
The REC OUT of the AMP1 is fed by the SPEAKER OUT signal, which means that all signal stages - including the power-amp stage - of the AMP1 are present. This means that the sound of the NANOTUBE going into saturation can also be heard on the REC OUT.
Can the REC OUT of the AMP1 be easily connected to an active speaker cabinet (P.A. or Studio monitor)?
Yes, this is possible. Should a hum occur, a DI box should be connected between the two units.
Can the REC OUT and the SPEAKER OUT be operated simultaneously?
Yes, the AMP1 has been specially designed so that both signals can be used simultaneously. Incidentally, one gets very interesting results when a miked-up cabinet and the REC OUT signal are combined.
What is the best way to get an unfiltered line signal from the Amp1 to a recording interface? By that I mean bypassing the speaker simulation so I can use digital IR's in my DAW.
Simply use a DI Box with a pad function (-20dB eg) on the speaker out to feed your recording interface.
POWER
Are the 100 watts on AMP1 peak or RMS power?The 100 watts are RMS power. The peak power of the AMP1 is 150 watts.
POWER SOAK
Is the REMOTE1 necessary for the power reduction of the power amp (Power Soak), or does the AMP1 itself offer this function?Since not everyone needs this function, since AMP1 sounds also very good at low volume, and the AMP1 itself has no more space for further controllers, we decided that the Power Soak can only be controlled via external controllers.
This is possible with the BluGuitar REMOTE1. It is also possible with the BluGuitar MIDI1 adapter interface and a MIDI controller from another manufacturer. The MIDI device needs to be able to send the Control Change number 30 to access the Power-Soak function in AMP1.
With the REMOTE1 connected to AMP1 I have no control of the POWER SOAK. On the right control area, it shows full power, no matter where the controller is. If the knob is turned to the left, the output will jump into the "Home" area, but I hear no difference. Is there an error here?
First of all: If the performance jump from STAGE to HOME is audible, the POWER SOAK works correctly. Nothing is broken, there is no defect.
The POWER SOAK in the AMP1 works differently compared to a classic Power Soak, but achieves the same if not better sounding results. Therefore it is helpful to understand the way it works:
Sound:
When the MASTER VOLUME is turned up high, the Nanotube together with the special Class-D power amplifier is driven hard. It goes into saturation and begins to change its sound properties - just like a classic full-tube amplifier. The resulting "fat guitar sound" is very popular with many guitarists. But it's also very loud! The power and thus the volume is simply too much, and therefore should be reduced. To keep the guitar amp "cranked” with a reduced volume, the Power Soak was invented.
Volume:
A classic Power Soak converts the power applied to the loudspeaker output to heat via large load resistors. The more signal that is sent through the resistors, the quieter, but also flatter and lifeless the sound becomes. Big transformers and more expensive components are used to emulate the load of a real speaker, to make the sound more alive when using a POWER SOAK.
The POWER SOAK in the AMP1 reduces the power over the operating voltage, and thereby reduces the volume of the amp. In this way, you can also produce the sound of an overdriven power amp at a lower volume. The POWER SOAK is completely sound-neutral in the "STAGE" range (100 watts to 7 watts, control range of the pot from 12 o'clock to maximum) since there is no resistance to interfere with the natural interaction of the power amplifier and loudspeaker.
If you do not hear a volume difference in the two ranges, this is because the MASTER VOLUME control on the AMP1 is not turned up far enough. The POWER SOAK only reacts if sufficient operating voltage is reached by turning the MASTER VOLUME on the AMP1 to at least 6 or 7.
So: Turn up MASTER VOLUME to at least 6 or 7 and then turn the POWER SOAK down until just before 12 o'clock, and then you can hear the POWER SOAK working and also the sound reduction. If this is still too loud, you can control the POWER SOAK beyond the 12 o'clock position in the HOME range area.
Video about this topic

SOFTWARE
Are firmware updates available for a better optimisation of AMP1?Yes, firmware updates are available. However, these relate only to the switching operating functions of AMP1. Since the sound of the AMP1 is 100% analog, it remains unaffected from firmware updates.
MIDI1
Can the AMP1 be controlled with MIDI?The AMP1 is MIDI-capable and can be controlled by external MIDI devices. To do this, you need our MIDI1 adapter, which allows you to connect a MIDI controller to the AMP1.
Video about this topic
I would like to use the AMP1 together with an external MIDI effects device. I would like to use the effects of the external device and simultaneously control the AMP1 via MIDI commands (Program Change and Control change) from the effects device. Is that possible?

Yes, this is possible, depending on the midi effect or midi controller device. The AMP1 can handle program change commands as well as control change commands from an external MIDI controller. The controller must be connected to the AMP1 via the MIDI1 adapter.
With the help of program change commands, all 4 channels, BOOST and REVERB can be switched on the AMP1. Additionally MASTER VOLUME, POWER SOAK and GAIN can be changed via midi control change commands. To use the audio effects of the external MIDI effects device, the effect device must be integrated into the signal chain (before, or into the FX loop of the AMP1) using instrument cables. The MIDI (foot) controller sends a program change number, which can be assigned to a specific effect on the midi effect device, while AMP1 switches to a desired setting simultaneously by receiving midi data.
Using MIDI1, my midi-controller device cannot control the AMP1. What am I doing wrong?
First, make sure that your MIDI-controller sends program change commands to midi channel 1, and not to all 16 midi channels (omni). This prevents multiple program change commands from being received simultaneously by the AMP1. The MIDI LEARN function allows you to assign switching settings on AMP1 for each incoming MIDI program change number. This is done as follows: Connect your MIDI controller to your AMP1 using the MIDI1 adapter. Select your desired sound on the AMP1 (channel, boost on / off, reverb on / off, etc) - tone control and custom control settings cannot be stored. Press and hold the boost button until it flashes. The flashing indicates that MIDI Learn is active. If a MIDI program change command is sent now, the AMP1 saves this command with the settings on the AMP1. The result: every time this program change number is received via MIDI, exactly these settings are recalled from your AMP1.
When controlling the AMP1 via MIDI, some settings are automatically activated for each program (patch), which I have not been programmed (POWER SOAK or / and 2ND MASTER VOLUME are activated, CLEAN VOLUME or GAIN are reduced etc.), although all Control Change Commands are off. What am I doing wrong?
Obviously, there are "unwanted" values in the memory of the AMP1 (e.g., by testing in the store, etc.). These can be corrected (deleted) by a Factory Software Reset. To do this, press and hold all three foot switches and then turn on the power.
When controlling the AMP1 with my MIDI board, POWER SOAK and GAIN are automatically reduced with each Program (Patch) change. What am I doing wrong?
Obviously, the MIDI board sends control change commands. Please make sure that all control change commands are set to off, or with activate control changes, the maximum value is retrieved.
I´m having problems sending MIDI Program Changes from a MIDI controller (Roland ES-8) to AMP1. It seams that the Midi-Learn function isn't saving MIDI Program Changes correctly. I can correctly send PC messages to my Eventide H9, but the AMP1 doesn't respond to them.
Many MIDI controllers are able to send several MIDI Program Changes on separate channels, so they can control several MIDI units each on it own MIDI chanel. It is important, that you address every MIDI unit in your system with a separate MIDI channel. You have to make sure that for each patch your controller sends the right PC message on the right channel.
Use MIDI Channel1 and send a PC message from your controller to match your controller patch with the setting of AMP1 using MIDI Learn on AMP1.
Check:
If you use the midi 1 adaptor and any switching is happening - the cable and amp1 work.
If there is only 1 midi command coming in from each patch of your controller to AMP1 it will work perfectly.
Here is the feedback from a customer how he found the solution with his ES-8:
It was totally an ES-8 issue.
"I got the ES-8, Amp1 and H9 all playing nicely together, at last! The solution was quite simple, if not completely obvious, at first. When you write a patch on the ES-8, you enter 'Patch MIDI (1-8) and then on the next screen you select your MIDI channel, PC#, etc. I tried using Patch MIDI1 at first and when that didn't work, I tried Patch MIDI2 & Patch MIDI3, also no luck. Today, just for fun, I tried using Patch MIDI8, MIDI Channel 1 (Amp1 only works on this channel) lo and behold, it worked! Next, I tried sending some PC commands to the H9 on MIDI Channel 2 (as configured in the H9 settings) and it didn't work. So I switched to Patch MIDI7, MIDI Channel 2 and that did the trick as well. So now, on a single patch, I've got the Amp1 channel/boost/reverb setting as well as the H9 program that I desire and of course all the analogue pedals are easy to punch in and save there as well.”
As a follow-up, I’ve also got the CC gain control working as well.
I’m using MIDI1 to send CCs to the AMP1. I have my MIDI controller set up to use MIDI channel 1, and I use CCs 007, 020 and 030 to try to change master/powersoak/gain. But the AMP1 doesn’t seem to receive them. Sending PCs to select different channels, boost, reverb works fine. What’s wrong?
First of all: If the PCs switch the settings of the AMP1, then MIDI (including CCs) works. So the problem is not the AMP1 or the MIDI1, but the MIDI controller. MIDI uses 0 - 127 to encode the CCs, but some equipment (for example the Harley Benton FXL8 PRO) use numbers 1 - 128. So if you add 1 to the CCs in the AMP1 manual and use these values, you can adjust master/gain/powersoak. So for example, you set the FXL8 to CC008 to adjust the master volume, CC021 for gain, CC031 for power soak.
I have problems switching my AMP1 via MIDI. I use a BOSS MS-3 / Line6 HX Effects.
The AMP1 MIDI logic is so easy! In 99,9% of all cases the sending MIDI device is the cause of a switching problem. This is now to proceed when programming a patch meaning to switch the AMP1:
- Please make sure that you clean all MIDI send commands on all channels of the sending device when programming a patch.
- Make sure your device sends only on MIDI Channel 1.
- Select one MIDI program change number per Patch on your MIDI sending device.
- Perform MIDI LEARN on your AMP1
SOUND (OPERATION)
If I use a clean booster in the effect path of the AMP1 as a volume booster for a second master volume, how far can I turn the boost control up without the AMP1 being damaged?You can turn the booster as far as you want! Nothing is damaged in this way, the Nanotube is working at the RETURN of the effect path. It can handle this power, but it will start to distort at higher boost levels. If you do not want this to happen, you should make sure that the Booster is not exceeding a few db boost.
To enable the largest possible headroom, press the push-push switch on the bottom of the AMP1 to control the sensitivity of the FX loop (+ 4dB).
The better solution is a "minus booster" since it is sound-neutral. A second, lower volume can be recalled by means of a minus booster switch, which is then your rhythm level. If you switch off the minus booster, the full level is ready for solo use.
When the BOOST is activated, the signal is muted for a short moment. Is that normal?
Since the signal path in the AMP1 is 100% analog, "popping" noises occur in various switching processes. Especially the boost function is very critical. Therefore the signal is muted for about 4 ms when switching the boost.
Video about the topic
Boost Mute
Class D is just a technology to reduce internal heat. The harmonics in AMP1’s power amp are naturally generated by tube and analog circuitry, in best composition of A + A/B, just like in traditional tube amplifiers. These are even switched for the AMP1’s four different channels.
FX-LOOP
According to the manual, the FX Loop Level Switch is located on my AMP1 in a recess on the bottom case. Is the switch missing on my device?The FX Loop Level Switch sits as a push-push switch in the recess. It can be reached by means of a thin elongated object, e.g a screwdriver. But please just press it - do not turn it!
I am using several devices in the FX loop. Some I want to use in serial, others in parallel mode. For this, I switch the FX loop on the AMP1 to SERIAL and use an external additional device (Lehle Parallel), which adds an additional parallel loop. Is this also possible without additional equipment?
No, this is only possible with additional equipment.
I prefer to work with a volume pedal than with the volume knob on the guitar. How do I connect the volume pedal in this case? Before the INPUT on the amp, or the FX loop?
The placement of a volume pedal in the signal chain will have an influence on the function of the pedal. Any change in the volume of the signal before the INPUT of the amp has an effect on the overdrive of the preamp. If you want to use a volume pedal to replace the volume knob of the guitar (like a Gain control), it must be placed before the amplifier's input. If you want to control the master volume of the amp without affecting the tone or gain, the pedal must be looped after the preamp in the effect loop in serial mode. Both versions are used by different types of guitarists, it is just a matter of what you prefer.
How can I control the effects level of an effect, when I use my Effects device in the loop set to parallel mode? Is there a dry / wet control on the AMP1? If not, can I control it with a volume pedal?
The FX level cannot be controlled directly on the AMP1. Therefore, the amount of effect must be directly controlled on the effects unit via the volume on the device. If this is not possible on the effects unit, you can use a volume pedal, which is inserted behind the effect’s device in the FX loop (switched to parallel mode). With the help of the volume pedal, now the mixing ratio can be controlled (to a certain extent).
BOOST
Does the Custom Control Pot for BOOST on the side of AMP1 control volume or gain of the BOOST?The boost on the AMP1 is a two-stage gain boost, which is working in front of the channels. The Custom Control Pot on the AMP1's chassis side controls both gain and volume of the BOOST. Turned up halfway the signal (similar to a treble booster) is more transparent and gets more gain. Beyond the middle position, the boost itself begins to slightly overdrive (similar to a tube screamer). A moderate boost in volume is associated with this. For a sound-neutral increase (or decrease) of the volume, AMP1 offers a 2ND MASTER VOLUME function. This can be accessed via the REMOTE1 or Midi. Alternatively, you can use a minus booster or a volume pedal in the effect loop (switched to serial) to control the overall volume.
EASY LOCKS
What are the Easy Locks used for?The EASY LOCKs are strong neodymium magnets for mounting the AMP1 e.g. on a pedalboard. They are screwed onto the board and form the counterpart to the magnetic metal plates which are mounted on the underside of the AMP1. With a correct and proper assembly, the EASY LOCKs hold a load of up to 10 kg. which is more than sufficient for the AMP1. With the help of the EASY LOCKs, the AMP1 can be installed and disassembled very easily. You can take it along for a little club gig or put in the guitar Gig Bag, clean and easily removed for later mounting again on the board.
It is important to install the EASY LOCKs correctly for the best magnetic contact, especially paying attention to the correct distance between the two magnets. For this purpose, a drilling template is available at https://www.bluguitar.com/service.html. On some surfaces, it is helpful to screw the Easy Locks a little looser, so they can have 100% contact to the metal plates on AMP1.
Video about the topic
Easy Lock
WHAT´S NEW
Can the original AMP1 be modified or updated to AMP1 Mercury Edition?The AMP1 can not be modified or updated to Mercury Edition, because the ladder is equipped with a different PCB and some different hardware components.
Can the original AMP1 be exchanged for an AMP1 Mercury Edition?
The AMP1 Mercury Edition is equipped with a different PCB and some different hardware components, and it costs a little bit more that the original AMP1. That's why it's not possible to exchange the original AMP1 for an AMP1 Mercury Edition.
REMOTE1
How does the factory reset work with REMOTE1?
The factory reset of the REMOTE1 works as follows: Disconnect the REMOTE1 from AMP1 by removing the jack cable, thus interrupting the power supply of REMOTE1. Then press buttons 1, 6 and 7 on the REMOTE1 and keep pressed while re-inserting the jack cable. Release the three foot switches. If preset 1 is active now on REMOTE1, the reset procedure was successful.
How do I switch the REMOTE1 into MIDI mode to control external MIDI devices?
The REMOTE1 works with MIDI in a very simple way. Therefore, you do not need to activate any mode. MIDI-Program-Change commands are always present in parallel to the presets at the MIDI OUT socket (see owner's Manual).
How can I use the REMOTE1 to control MIDI-capable external effects?
To connect external MIDI-capable effects with the REMOTE1, connect the REMOTE1's MIDI OUT jack to the MIDI IN of the external effect’s device. Please assign a preset on your effects device to the program change command sent by the REMOTE1. Refer to the REMOTE1 Owner's Manual for a table of MIDI allocations.
Depending on the respective effect device, this is done by programming the desired effect to the respective preset number. Some effects devices offer MIDI mapping or MIDI Learn. In any case, make sure that your MIDI device is set to MIDI receiving channel 2.
How do I save settings to a preset in an external MIDI effect device connected to REMOTE1?
These memory allocations must be performed on the external MIDI effect device, as the REMOTE1 sends fixed program change command numbers directly connected to their presets.
When I set a 2ND MASTER VOLUME for a particular channel in Direct Access Mode and then switch it to another channel, the value of the 2ND MASTER VOLUME remains the same. Why can I not set different 2ND MASTER VOLUMES for different channels?
In direct access mode, you have direct access to all switching functions. 2ND MASTER VOLUME, FX loop ON / OFF, REVERB and GAIN are superordinate functions, which are not switched off or changed when switching the channels. The reason for this: The volume of the 4 channels can be matched using the Custom Controls or CLEAN VOLUME and OVERDRIVE MASTER on AMP1 itself. If the balance of all channels is working for you, you can adjust and recall a Second master volume for all channels on the REMOTE1. Usually, this works fine as a rhythm and solo volume for all channels. If you want different levels of the second master volume per channel, use the preset mode. Here you can control and store the level of the 2ND MASTER VOLUME per preset.
If you need different 2ND MASTER VOLUME levels for the individual channels, please use the Preset Mode, which allows you to store an individual 2ND MASTER VOLUME level for each preset.
After I have connected the REMOTE1, I get a loss of volume.
In the REMOTE1, gain, master volume and Powersoak can be reduced and stored. If a loss of volume occurs when the REMOTE1 is connected, this is due to the fact that the currently active preset has a reduced value for one (or two or all three) of the parameters. If the volume loss is unintentional, the three parameters should be re-stored with the volume control turned up to full. With a reset of REMOTE1, all values will also be set to MAX. However, any previously saved user presets are replaced by factory presets.
If the AMP1 does not deliver 100% volume, gain or power (Soak) without REMOTE1: connect the REMOTE1 and turn all parameters to full before you disconnect the two devices and / or switch off and then disconnect.
You could also do a reset on AMP1 if the AMP1 does not deliver 100% volume, gain or power (Soak) without REMOTE1.
Can I control two different MIDI-capable devices simultaneously with REMOTE1 in addition to switching functions on the AMP1?
Yes, this is possible in the preset mode with REMOTE1! The REMOTE1 sends a fixed MIDI program change command for each preset on MIDI channel 2. This can be taken from the MIDI OUT socket of the REMOTE1. If you connect a MIDI effect device to this jack, you only have to assign the desired effect to the program change command that is sent via MIDI. For the integration of a second effect device, this must be connected to the MIDI THRU socket of the first effect device. Also in this second effect device, the same program change command of the REMOTE1 needs to be assigned to the desired effect preset for this device. In this way, two different MIDI-capable devices will switch simultaneously.
When in Direct Access mode, the BOOST switch of my REMOTE1 does not react when pressed down, but only when it is released. Why is that?
When the REMOTE1 is operated in Preset mode, all foot switches react when pressed down. As for the operation in Direct Access Mode, some of the switches do not react before the are released. There is a simple reason for that: some of the switches (BOOST, FX-LOOP) have a second function, which can be activated by pressing down and holding the switch for a few seconds. So pressing down the switch and instantly releasing it triggers a different operation than pressing the switch down and holding it. This is why the operating of these switches is not initiated when pressed down, but when released.
LOOPER KIT
Does the LOOPER KIT supply power to the four loops when it is connected to the REMOTE1?No, the LOOPER KIT is a true Bypass Relay Switcher for the audio signal. The LOOPER KIT has nothing to do with the power supply of the pedals.
I would like to activate an effect pedal in the FX loop of the AMP1 and at the same time a second effect pedal, which is plugged into loop 1 of the LOOPER KIT that works in front of the AMP1. Is this possible?
This is possible. For each preset REMOTE1 can memorize "on - off" of the FX loop of the AMP1 as well as for each of the 4 loops of the LOOPER KIT. The following applies to the example described above:
- Set all the effect pedals to ON
- Connect effect pedal 1 in the FX loop of the AMP1.
- Connect the LOOPER KIT in front of the AMP1, put the effect pedal 2 into the first loop of the LOOPER KIT.
- When storing a preset with the REMOTE1, make sure that both: the FX loop of the AMP1 and the first loop of the LOOPER KIT are set to ON.
’61 MASTERBUILT GITARRE
How does the circuitry of the dummy coil work? On which pickup does the dummy coil work? How are the intermediate positions switched with the dummy coil?The dummy coil is activated via the push-push switch on the lower tone pot. When the pot is set to "out" the dummy coil circuit is active. The dummy coil works only on the neck and bridge pickup. If the middle pickup and settings are selected via the 5-way switch, it is automatically switched off since the center pickup is "reverse-wound" and the dummy coil is not used here (it would actually increase the hum). Thereby 4 of the 5 sounds are hum reduced, except for the middle pickup only position.
When the push-push pot is extended, the trem-arm volume pot gets stuck. What can I do to fix this? Is Teflon tape an option?
Teflon tape is generally a good idea since it prevents the thread from wearing out. In addition, it suppresses background noise, but it does not change the angle, which must be changed depending on the setting of the vibrato arm, so that the vibrato arm no longer hits the "extended" tone pot. You can fix this problem by bending the trem-arm. To do this, clamp the arm on the thread side with two wooden plates in a vice and then bend the long part of the lever - at the end, a minimal modification is enough. The lever should only be bent so far that it just rests over the pot. Otherwise, it will be too far away from the scratchboard. In doing so, the angle of the vibrato block (from supported to free-floating) plays an important role. Thomas Blug has adjusted the block so that the G string can be "pulled" by the tremolo to a minor third. He used this as a guide to adjust the tremolo arm.
Does the neck have to be removed to adjust the neck?
As with most "vintage Fenders", the truss-rod is only accessible from the pickup side. If you loosen your neck, you can raise it slightly and change the tension of the truss-rod. You do not have to remove the neck completely. The strings can be fixed with a capo on the first fret during this operation.
The vibrato is set at quite a steep angle. How can I adjust this to a lower angle?
Thomas likes this slightly larger angle, this is why the vibrato is adjusted this way in the factory. To make the vibrato flatter, the claw on the back has to be screwed in deeper.
If one of the screws will no longer screw into the wood. Can you do something about that?
There is a home remedy, which has already been used in countless old vintage guitars: Just put a toothpick or a match in the screw hole and break it at the edge. If you now put the original screw back in the hole, this will hold the screw in place, just like new.
BLUBOX
What connection possibilities are there with the BluBOX?There are several ways to integrate BluBOX into your setup:
The BluBOX can be inserted between the SPEAKER OUT of the amp and the speaker cabinet for excellent recordings without complex microphone Techniques. Thus the mic, the microphone stand as well as all negative side effects such as crosstalk and unwanted vibrations will disappear. What remains is a consistent very good sound in any situation. The BluBOX is simply connected to a mixer like a microphone with a microphone cable. As with a "real" microphone, the transformer integrated in the BluBOX prevents potential hum. Of course, you can also use the signal of the BluBOX in combination with a guitar-cabinet that is miked up with a microphone.
If you do not want to use a guitar cabinet and still want the beloved sound of a tube amplifier with full power without compromises, you can use the BluBOX with the beloved tube amplifier and instead of a guitar cabinet connect a load-box. The load-box is quiet, turns the power of the amplifier into heat and prevents the tube amplifier from being damaged.
The special thing for AMP1 users is that they can connect the BluBOX to the loudspeaker output of the AMP1 and can use this combination without any loudspeaker or load box connected to AMP1´s speaker out. The AMP1's unique and innovative power amplifier is ideally suited to deliver all sounds - even fully turned up to saturation - without a load from a connected loudspeaker box or load box. The guitar-cabinet sound comes from the BluBOX. Although the BluBOX is designed for use with guitar amplifiers, it also delivers fantastic direct sounds with pedals or preamplifiers. Just connect the last pedal of your pedalboard or the line out of your preamp to the LINE INPUT of the BluBOX, and do without a guitar amplifier. More compact than this is not just not possible!
If I use the BluBOX with a classic tube amplifier, do I need to connect the SPEAKER THRU of the BluBox to a load-box or guitar cabinet?
Yes, with classic tube amps it is essential! Traditional tube amps always need a load in the form of a guitar cabinet or a load box. The BluBOX does not have a load built in. In other words, it is a speaker simulation combined with a DI box. Therefore, a guitar cabinet or load box must always be connected to the SPEAKER THRU of the BluBox when using a traditional valve amplifier. An exception is the AMP1, which can be operated without a load of a loudspeaker or load box. The unique, innovative power amplifier of the AMP1 is ideally suited to deliver all sounds - even fully turned up to saturation - even without a loudspeaker box or load box connected.
My amp has a 4, 8, and 16-ohm output. What does BluBOX do with it?
The BluBOX does not represent a load resistor. The signal is directly looped through from the SPEAKER INPUT to the SPEAKER THRU. This means that the load resistor connected to the SPEAKER THRU must correspond to the impedance required by the amp.
What is the difference between the BluBOX and the Two Notes Torpedo C.A.B.?
The BluBOX offers 16 different speaker simulations including appropriate microphoning, but does not include preamp simulations or reloadable impulse responses. The BluBOX deliberately offers less modifiable parameters. The presets are based on Thomas's years of experience. With only two controls it is reduced to the max for intuitive and easy stage use. So it is almost impossible to get bad results.
Unlike the Torpedo, the BluBOX includes a DI box with a transformer, which prevents hum problems both in live mode and in the studio.
The XLR-OUT and the HEADPHONE OUT of the BluBOX are only generating a „pock-pock-pock“ noise. Is the BluBOX faulty or damaged?
There are two possible causes for this:
1.) The power supply used is an AC power supply. In this case, "AC" instead of "DC" is indicated somewhere on the power supply.
2.) The supply voltage is plus and minus reversed. Another power supply should be used. The BluBOX needs 9 to 18 Volt DC, center negative. BOSS power supplies work.
What cable do I need to connect the AMP1 to the BluBOX? Does it have to be a speaker cable or can I also use a guitar cable / patch cable?
To connect the AMP1 to the BluBOX, you can either use a speaker cable or a normalguitar cable / patch cable.
The output signal of the BluBOX generates a strong static noise. Is it a defect?
The BluBOX is not adequately leveled. To minimize the noise, the BluBOX must be properly leveled. The 3-step input sensitivity switch is used for this purpose. This should initially be in the middle position. If the input signal is very quiet, the switch should be set to HIGH. If the signals are very loud, you should switch to LOW.
The small LED indicates the level: Green means "level on", red means "maximum leveling".
The LED may at times also be briefly red but should not permanently light red only.
The small LED indicates the level: Green means „input level on", red means "maximum leveling".
When the LED lights up red, a compression effect with a very discreet overdrive occurs. This effect is similar to the sound of a driven loud speaker. The optimal sound to noise ratio is obtained when the LED is predominantly green, but changes with loud signals sometimes between green and red.
You can operate the AMP1 without a load, so it does not necessarily has to be connected to a guitar cabinet if you use the BluBOX with the AMP1.
Does it make a difference to the guitar sound of the BluBOX whether a guitar cabinet is connected or not?
Yes, it has an effect on the guitar sound characteristics whether a speaker is connected or not. A connected speaker brings a bit more bite and bottom.
There is a sonic difference if the loudspeaker is connected to the SPEAKER LEVEL THROUGH of the BluBOX or the second loudspeaker output of the AMP1, since the BluBOX offers two different cabinet simulations: When a loudspeaker is connected to the SPEAKER LEVEL THROUGH of the BluBOX, the BluBOX switches to a different cabinet simulation. Many people prefer this setup to simply run the loudspeaker box on the second loudspeaker output of the amplifier.
You can definitely experiment with these three variations (cabinet on the SPEAKER LEVEL THROUGH of the BluBOX, cabinet on the SPEAKER OUT of the AMP1 or no cabinet at all).
Important! If you use a classic tube amp (eg. Fender, Marshall etc.), always connect a speaker or a load to avoid damage on the amp!
The phones out sounds slightly overdriven when playing clean tones with the BluBOX. How to avoid it?
There is no dedicated output level control for phones on the BluBOX. Different phones produce different volumes. E.g. a Sennheiser HD25 is pretty loud, others might have a lot less volume. To bring up the headphones volume you should not cranck CLEAN VOLUME or MASTER VOLUME on AMP1, since the amp will start to overdrive. Instead please use the input sensitivity switch of the BluBOX on position "HI", and make sure you level AMP1's volumes so that the level indicator shows green and flashes red for peaks. In case your phones are still not loud enough, please use louder phones.
BluBOX is so compact we could not find the room for a dedicated headphones volume control.
I have the Amp 1 which sounds great through my 1x12 cab. I have recently bought the Blubox and use to DI straight into the PA but it sounds really fizzy, nothing like the tone from the cab gain wise.
First of all please make sure that you have the right connections. Please use speaker out from one into speaker level input of the BluBox. Put the input level switch to the middle position, and make sure it is mostly green, sometimes red is not a problem. Select CabType stack 70 (as this sounds balanced and warm) - set Mic position to Center.
Use XLR out to your microphone input of the PA.
Make sure your EQ is that flat. Now you should hear something pleasant. In case you're PA speakers have a boosted high-end you could use the mic position anti-clockwise to reduce the bite.
If you use the Cabinet at the same time with the blue box, you should connected to the speaker level through on the blue box. Make sure the impedance of the cabinet majesty impedance of the output that you are using on AMP1.
If this doesn't sound like a guitar cabinet, we have to check further details:
EQ setting on AMP1.
Make sure you have not too much treble.
Setting:
Bass: 5
Mids: 5
Treble: 3
You can also make extreme settings that will sound good like:
Bass: 10
Mids: 10
Treble: 0
As long you are using mids you'll get a good and healthy sound...it's because there is already treble in the mids.
BluBOX needs a power supply that delivers 9 to 18 volts. Does the voltage of the power supply make a difference in terms of sound?
Yes, there is a marginal difference: A higher voltage leads to a slightly crisper sound, a lower voltage makes the sound marginally softer.
I'm using the BluBOX with my amp, and I now want to buy a load box. Do you recommend any specific model for the use with BluBOX?
A: In terms of impedance, the BluBOX is absolutely neutral, so it has no impact on the sound of your power amp. This means that the load box has to be harmonized with the power amp being used, not with the BluBOX. That is why we cannot recommend a specific load box for the use with BluBOX.